Heyy :)
Okay guys, I've realised that I've not yet given clear instructions on how to quill using perler bead designs for inspiration.
So, I'm gonna show you how to make a really adorable game boy advance console by paper quilling.
First off, I'll show you the image I'm going to be working off :)
Here it is. I got this image from Google, so it doesn't belong to me. I think it's really quite nifty, don't you?
Anywho, we're gonna make this quilling style :) Of course you can just make it using perler beads, but it's so much more rewarding when you know you've made it all yourself from scratch XD
Moving on, Here are the things you're gonna need for the job, or at least the tools I'll be using, Your welcome to improvise :D
O Paper strips
O A slotted quilling tool or toothpick you can roll the strips around
O Glue (you can apply it using a skewer, toothpick, or anything pointy lolz) But I find this little squeezy tube perfect for the job, less messy and also re-fillable.
You're also gonna need a well lighted workspace because this is fiddly work :)
Now to make this quilly style, you need to cut the same number of paper strips as there are perler beads in the image.
This is gonna take a while, but to make it easier, I stuck the image on paint and crossed them off as I cut the strips so I wouldn't lose track.
The strips I made were about four millimetres wide and four centimetres long.
To make the little paper perler beads I simply rolled them into the tightest coil I could around the quilling tool, and secured it in place with a dot of glue. Push it off the tool and Hazaah! You have your first paper perler bead :D
Okay, now all you need to do is make the little beads whenever you have free time, it doesn't have to all be done in one go.
Once all of them have been made, you just need to stick them together to form the game console. I'll show my work as it progresses :)
I generally assemble the pieces in little groups and stick them all together like a jigsaw afterwards. For now i'm gonna stick all the white pieces together. This is what it looks like :D
My finger's in the piccie because it shows us the scale we're working with :)
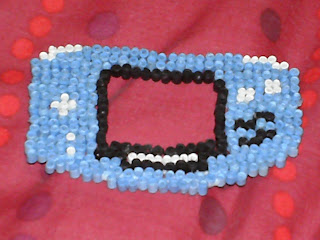
After all the hard work we spend on making and forming the little GBA this is what it should look like :D :
However, it turned out slightly wonkier than i'd have liked, but I love it all the same :) Maybe next time I'll line them up using a ruler :D I hope you have lots of fun making this! I know I have :)
After making this I decided to try out some other mini paper perler projects and lining them together with a ruler :) This is what they look like, I hope you like them.
These were so fun to make :) Aren't they just adorable??
And they can be used for embellishing so many things, or you can even use them to make little gift scenes like this little ninja here:
Have fun with this, and make it your own! :)


No comments:
Post a Comment